首頁,SRC一鍵還原,預設是把硬碟的第一磁區,ghost到同一顆的第二磁區
(這可以改,但是就先不要去動它了,有興趣的自己去研究一下)
一、取消「系統保留」那 100 MB,
可參考 http://evil-ms.blogspot.com/2011/02/windows-7-100mb-bitlocker.html
1.在安裝 windows10時,選自訂
2.然後,建立二個主要磁區,會有一個約 100 MB 的系統保留自動出現,共三個
3.刪除,第二個磁區,就是 系統保留 下面那個,然後按一下「系統保留」,選「延伸」
4.這時,分割硬碟就剩二個磁區了,
二、建立放置 ghost 檔的磁區
1.完成上面的動作後,刪除第二個磁區,建一個「主要磁區」,約 10 GB,成為「第二」個磁區,
2.剩下的,建主要磁區,當作以後系統的 D 槽
三、按第一個磁區,安裝 windows 10
四、安裝完後,以 windows PE 開機 (因為 windows 10 跑 src 的 bat 檔閃一下就失敗了)
五、進入 windows PE,執行 SRC 裡面的 bat 檔,安裝完成
2020年7月13日 星期一

2020年4月23日 星期四
從ubuntu20.04開始
1.安裝 ubuntu 20.04
2.安裝 fcitx fcitx-table-boshiamy fcitx-chewing
sudo apt-get update
sudo apt-get install fcitx fcitx-table-boshiamy fcitx-chewing
3.安裝 chrome
4.安裝 AMP
一、apache2
5.更改 html 位置
mkdir html
cd /var/www
sudo mv html html_old
sudo ln -s /home/wang/html ./
6.下載 phpMyAdmin
7.安裝 geany
8.下載 phpstorm
9.安裝 virtualbox
sudo apt-get install virtualbox
10.關閉回報問題
gksu gedit /etc/default/apport
enable=0
7.安裝 shutter
sudo add-apt-repository ppa:linuxuprising/shutter
sudo apt-get update
sudo apt-get install shutter
8.winehq 安裝字型
對於一些win下的軟體,在ubuntu下用winehq執行,新細明體無法顯示
參考自 https://lordgod11.pixnet.net/blog/post/32414083-ubuntu-winehq%E4%B8%AD%E6%96%87%E5%AD%97%E5%AE%89%E8%A3%9D%E8%A8%AD%E5%AE%9A
sudo mv 新細明體.ttc /usr/share/fonts/truetype/win_fonts
sudo fc-cache -fv
2.安裝 fcitx fcitx-table-boshiamy fcitx-chewing
sudo apt-get update
sudo apt-get install fcitx fcitx-table-boshiamy fcitx-chewing
3.安裝 chrome
4.安裝 AMP
一、apache2
sudo apt-get install apache2
二、Mysql5.7
sudo apt-get install mysql-server mysql-common mysql-client
進入mysql管理
sudo mysql -u root
刪除root帳號
DROP USER 'root'@'localhost';
新增root帳號,密碼123456
CREATE USER 'root'@'%' IDENTIFIED BY '123456';
授權
GRANT ALL PRIVILEGES ON *.* TO 'root'@'%' WITH GRANT OPTION;
刷新
FLUSH PRIVILEGES;
離開
exit
二、Mysql5.7
sudo apt-get install mysql-server mysql-common mysql-client
進入mysql管理
sudo mysql -u root
刪除root帳號
DROP USER 'root'@'localhost';
新增root帳號,密碼123456
CREATE USER 'root'@'%' IDENTIFIED BY '123456';
授權
GRANT ALL PRIVILEGES ON *.* TO 'root'@'%' WITH GRANT OPTION;
刷新
FLUSH PRIVILEGES;
離開
exit
三、php7.4
sudo apt-get install php7.4 php7.4-cli php7.4-json php7.4-mbstring php7.4-gd php7.4-xml php7.4-ldap php7.4-mysql php7.4-curl php7.4-zip
四、下載安裝 composer
wget -c https://getcomposer.org/composer.phar
chmod +x composer.phar
sudo mv composer.phar /usr/local/bin/composer
五、安裝 git
sudo apt-get install git
四、下載安裝 composer
wget -c https://getcomposer.org/composer.phar
chmod +x composer.phar
sudo mv composer.phar /usr/local/bin/composer
五、安裝 git
sudo apt-get install git
5.更改 html 位置
mkdir html
cd /var/www
sudo mv html html_old
sudo ln -s /home/wang/html ./
6.下載 phpMyAdmin
7.安裝 geany
8.下載 phpstorm
9.安裝 virtualbox
sudo apt-get install virtualbox
10.關閉回報問題
gksu gedit /etc/default/apport
enable=0
7.安裝 shutter
sudo add-apt-repository ppa:linuxuprising/shutter
sudo apt-get update
sudo apt-get install shutter
8.winehq 安裝字型
對於一些win下的軟體,在ubuntu下用winehq執行,新細明體無法顯示
參考自 https://lordgod11.pixnet.net/blog/post/32414083-ubuntu-winehq%E4%B8%AD%E6%96%87%E5%AD%97%E5%AE%89%E8%A3%9D%E8%A8%AD%E5%AE%9A
sudo mv 新細明體.ttc /usr/share/fonts/truetype/win_fonts
sudo fc-cache -fv
2019年9月3日 星期二
laravel6安裝
一、使用 composer 創建專案
composer create-project --prefer-dist laravel/laravel 專案名 "6.*"
裝完, .env 檔也建好了, key 也建好了。
如果沒有 key ,自行下指定 php artisan key:generate
二、修改設定檔
2.1 設定
修改 config/app.php
...
'timezone' => 'Asia/Taipei',
'locale' => 'zh-TW',
'fallback_locale' => 'zh-TW',
...
2.2 語系
https://github.com/caouecs/Laravel-lang
下載 zh-TW 至 resourses/lag/
三、變更目錄權限
sudo chmod 777 -R storage/ bootstrap/cache/
或是指定給 apache
四、apache 設定
<VirtualHost *:80>
ServerName 專案網址
DocumentRoot /var/www/html/專案名/public
<Directory "/var/www/html/專案名/public/">
Options -Indexes
AllowOverride All
Require all granted
</Directory>
</VirtualHost>
五、連線成功畫面

六、資料庫設定
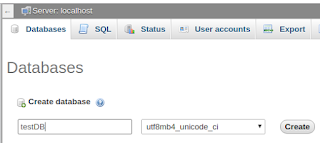
6.1 建立一個資料庫,如 testDB
七、使用者認證
7.1 增加路由及視圖
composer require laravel/ui "1.*"
php artisan ui vue --auth

7.2 裝好之後,執行
composer create-project --prefer-dist laravel/laravel 專案名 "6.*"
裝完, .env 檔也建好了, key 也建好了。
如果沒有 key ,自行下指定 php artisan key:generate
二、修改設定檔
2.1 設定
修改 config/app.php
...
'timezone' => 'Asia/Taipei',
'locale' => 'zh-TW',
'fallback_locale' => 'zh-TW',
...
2.2 語系
https://github.com/caouecs/Laravel-lang
下載 zh-TW 至 resourses/lag/
三、變更目錄權限
sudo chmod 777 -R storage/ bootstrap/cache/
或是指定給 apache
四、apache 設定
<VirtualHost *:80>
ServerName 專案網址
DocumentRoot /var/www/html/專案名/public
<Directory "/var/www/html/專案名/public/">
Options -Indexes
AllowOverride All
Require all granted
</Directory>
</VirtualHost>

六、資料庫設定
6.1 建立一個資料庫,如 testDB

6.2 修改 .env 檔
...
DB_DATABASE=testDB
DB_USERNAME=帳號
DB_PASSWORD=密碼
...七、使用者認證
7.1 增加路由及視圖
composer require laravel/ui "1.*"
php artisan ui vue --auth

上方多了 LOGIN 及 REGISTER
7.2 裝好之後,執行
npm install && npm run dev
7.3 修改 route/web.php
少了一個路由
Route::get('home', 'HomeController@index');
八、更改為使用 username 登入
8.1 改 database/migrations/2014_10_12_000000_create_users_table.php
...
$table->bigIncrements('id');
$table->string('name');
$table->string('email')->nullable();
$table->timestamp('email_verified_at')->nullable();
$table->string('username')->unique();
$table->string('password');
$table->tinyInteger('admin')->nullable();//管理者
$table->rememberToken();
$table->timestamps();
...
8.2 更改 app/User.php 增加兩位欄位
...
protected $fillable = [
'name', 'email', 'username', 'password', 'admin',
];
...
8.2 改 app/Htpp/Controllers/Auth/LoginController
...
public function username()
{
return 'username';
}
...
8.3 改 resources/views/auth/login.blade.php
8.4 改 resources/views/auth/register.blade.php
九、更改有 admin 的功能
增加一個 middleware
php artisan make:middleware AdminMiddleware
***
public function handle($request, Closure $next,$guard = null)
{
if (Auth::guard($guard)->check() && Auth::user()->admin == 1) {
return $next($request);
}else{
return redirect()->back();
}
}
***
7.3 修改 route/web.php
少了一個路由
Route::get('home', 'HomeController@index');
八、更改為使用 username 登入
8.1 改 database/migrations/2014_10_12_000000_create_users_table.php
...
$table->bigIncrements('id');
$table->string('name');
$table->string('email')->nullable();
$table->timestamp('email_verified_at')->nullable();
$table->string('username')->unique();
$table->string('password');
$table->tinyInteger('admin')->nullable();//管理者
$table->rememberToken();
$table->timestamps();
...
8.2 更改 app/User.php 增加兩位欄位
...
protected $fillable = [
'name', 'email', 'username', 'password', 'admin',
];
...
8.2 改 app/Htpp/Controllers/Auth/LoginController
...
public function username()
{
return 'username';
}
...
8.3 改 resources/views/auth/login.blade.php
8.4 改 resources/views/auth/register.blade.php
九、更改有 admin 的功能
增加一個 middleware
php artisan make:middleware AdminMiddleware
***
public function handle($request, Closure $next,$guard = null)
{
if (Auth::guard($guard)->check() && Auth::user()->admin == 1) {
return $next($request);
}else{
return redirect()->back();
}
}
***
2019年5月6日 星期一
弱點掃瞄解決
ubuntu 18.04下
檢測有無隱藏資訊
curl -L -I www.hdes.chc.edu.tw
檢測ssl
https://foundeo.com/products/iis-weak-ssl-ciphers/test.cfm
藏資訊
修改 /etc/apache2/conf-enabled/security.conf
ServerTokens = Prod
ServerSignature = off
修改 /etc/php/7.3/apache/php.ini
expose_php = Off
弱點:
TLS 1.0 enabled
sudo vim /etc/apache2/mods-available/ssl.conf
#SSLProtocol all -SSLv3
改為 SSLProtocol all -SSLv2 -SSLv3 -TLSv1 -TLSv1.1
若有申請 letsencrypt SSL憑證,請修改
sudo vim /etc/letsencrypt/options-ssl-apache.conf
Cookie(s) without HttpOnly flag set,without Secure flag set
sudo vim /etc/apache2/apache2.conf
加一行 Header edit Set-Cookie ^(.*)$ $1;HttpOnly;Secure
X-Frame-Options header missing
sudo vim /etc/apache2/apache2.conf
加一行 Header always append X-Frame-Options DENY
Directory traversal
https://hostadvice.com/how-to/how-to-setup-modsecurity-for-apache-on-ubuntu-18-04/
檢測有無隱藏資訊
curl -L -I www.hdes.chc.edu.tw
檢測ssl
https://foundeo.com/products/iis-weak-ssl-ciphers/test.cfm
藏資訊
修改 /etc/apache2/conf-enabled/security.conf
ServerTokens = Prod
ServerSignature = off
修改 /etc/php/7.3/apache/php.ini
expose_php = Off
弱點:
TLS 1.0 enabled
sudo vim /etc/apache2/mods-available/ssl.conf
#SSLProtocol all -SSLv3
改為 SSLProtocol all -SSLv2 -SSLv3 -TLSv1 -TLSv1.1
若有申請 letsencrypt SSL憑證,請修改
sudo vim /etc/letsencrypt/options-ssl-apache.conf
Cookie(s) without HttpOnly flag set,without Secure flag set
sudo vim /etc/apache2/apache2.conf
加一行 Header edit Set-Cookie ^(.*)$ $1;HttpOnly;Secure
X-Frame-Options header missing
sudo vim /etc/apache2/apache2.conf
加一行 Header always append X-Frame-Options DENY
Directory traversal
https://hostadvice.com/how-to/how-to-setup-modsecurity-for-apache-on-ubuntu-18-04/
2018年11月7日 星期三
利用 ffmpeg 切裁合併mp4檔
https://www.jianshu.com/p/eff314074177
先安裝 ffmpeg
sudo apt-get install ffmpeg
//截取從開始的30s
ffmpeg -ss 00:00:00 -t 00:00:30 -i keyoutput.mp4 -vcodec copy -acodec copy split.mp4
//截取從30s開始的30s
ffmpeg -ss 00:00:30 -t 00:00:30 -i keyoutput.mp4 -vcodec copy -acodec copy split1.mp4
//進行影片的合併
ffmpeg -f concat -i list.txt -c copy concat.mp4
其中的 list.txt 內容為
連結:https://www.jianshu.com/p/eff314074177
先安裝 ffmpeg
sudo apt-get install ffmpeg
//截取從開始的30s
ffmpeg -ss 00:00:00 -t 00:00:30 -i keyoutput.mp4 -vcodec copy -acodec copy split.mp4
//截取從30s開始的30s
ffmpeg -ss 00:00:30 -t 00:00:30 -i keyoutput.mp4 -vcodec copy -acodec copy split1.mp4
//進行影片的合併
ffmpeg -f concat -i list.txt -c copy concat.mp4
其中的 list.txt 內容為
file ./split.mp4
file ./split1.mp4連結:https://www.jianshu.com/p/eff314074177
2018年11月6日 星期二
ubuntu18.04安裝LAMP
ubuntu18.04在mysql的安裝比較麻煩一點
一、apache2
sudo apt-get install apache2
二、Mysql5.7
sudo apt-get install mysql-server mysql-common mysql-client
進入mysql管理
sudo mysql -u root
刪除root帳號
DROP USER 'root'@'localhost';
新增root帳號,密碼123456
CREATE USER 'root'@'%' IDENTIFIED BY '123456';
授權
GRANT ALL PRIVILEGES ON *.* TO 'root'@'%' WITH GRANT OPTION;
刷新
FLUSH PRIVILEGES;
離開
exit
三、php7.2
#軟體源拓展工具
sudo apt -y install software-properties-common apt-transport-https lsb-release ca-certificates
#軟體源
sudo add-apt-repository ppa:ondrej/php
#更新
sudo apt-get update
#安裝PHP7.2
sudo apt-get install php7.2 php7.2-cli php7.2-json php7.2-mbstring php7.2-gd php7.2-xml php7.2-ldap php7.2-mysql php7.2-curl php7.2-zip
一、apache2
sudo apt-get install apache2
二、Mysql5.7
sudo apt-get install mysql-server mysql-common mysql-client
進入mysql管理
sudo mysql -u root
刪除root帳號
DROP USER 'root'@'localhost';
新增root帳號,密碼123456
CREATE USER 'root'@'%' IDENTIFIED BY '123456';
授權
GRANT ALL PRIVILEGES ON *.* TO 'root'@'%' WITH GRANT OPTION;
刷新
FLUSH PRIVILEGES;
離開
exit
三、php7.2
#軟體源拓展工具
sudo apt -y install software-properties-common apt-transport-https lsb-release ca-certificates
#軟體源
sudo add-apt-repository ppa:ondrej/php
#更新
sudo apt-get update
#安裝PHP7.2
sudo apt-get install php7.2 php7.2-cli php7.2-json php7.2-mbstring php7.2-gd php7.2-xml php7.2-ldap php7.2-mysql php7.2-curl php7.2-zip
從elementary os 5.0 JUNO開始
一、安裝好它,升級它
sudo apt-get update
sudo apt-get dist-upgrade -y
sudo apt-get autoremove
sudo apt-get clean
二、安裝軟體庫
必須安裝這個,才能新增其他的 repository 庫
sudo apt install software-properties-common
三、安裝中文輸入法
安裝fcitx
sudo apt-get install fcitx
sudo apt-get install fcitx-chewing
sudo apt-get instsall fcitx-table-boshamy
設定為預設輸入法
im-config
四、在登入畫面時,讓NumLock是亮著的,順便關閉guest
安裝nukmockx
sudo apt-get install numlockx -y
修改,或新增設定檔
sudo vim /usr/share/lightdm/lightdm.conf.d/40-io.elementary.greeter.conf
增加numlockx on
-------------------------------------------------------------
[Seat:*]
greeter-session=io.elementary.greeter
user-session=pantheon
greeter-setup-script=/usr/bin/numlockx on
-------------------------------------------------------------
重開機即可
五、安裝elementary-tweaks(可改成按兩下滑鼠左鍵開啟)
sudo add-apt-repository ppa:philip.scott/elementary-tweaks
sudo apt-get update
sudo apt-get install elementary-tweaks
sudo apt-get update
sudo apt-get dist-upgrade -y
sudo apt-get autoremove
sudo apt-get clean
二、安裝軟體庫
必須安裝這個,才能新增其他的 repository 庫
sudo apt install software-properties-common
三、安裝中文輸入法
安裝fcitx
sudo apt-get install fcitx
sudo apt-get install fcitx-chewing
sudo apt-get instsall fcitx-table-boshamy
設定為預設輸入法
im-config
四、在登入畫面時,讓NumLock是亮著的,順便關閉guest
安裝nukmockx
sudo apt-get install numlockx -y
修改,或新增設定檔
sudo vim /usr/share/lightdm/lightdm.conf.d/40-io.elementary.greeter.conf
增加numlockx on
-------------------------------------------------------------
[Seat:*]
greeter-session=io.elementary.greeter
user-session=pantheon
greeter-setup-script=/usr/bin/numlockx on
-------------------------------------------------------------
重開機即可
五、安裝elementary-tweaks(可改成按兩下滑鼠左鍵開啟)
sudo add-apt-repository ppa:philip.scott/elementary-tweaks
sudo apt-get update
sudo apt-get install elementary-tweaks
2018年6月26日 星期二
用cetbot申請SSL,五分鐘搞定
一、先自行搞定 DNS,在網站伺服器 apache 上弄好DNS
二、連線到 cerbot 網站
https://certbot.eff.org/
選擇好你的 web server 及 os,我選的是 apache 、ubuntu 16.04
三、執行以下程式,安裝 cetbot
四、執行安裝導引程式
Saving debug log to /var/log/letsencrypt/letsencrypt.log
Plugins selected: Authenticator apache, Installer apache
Enter email address (used for urgent renewal and security notices) (Enter 'c' to
cancel):
2.同意
Please read the Terms of Service at
https://letsencrypt.org/documents/LE-SA-v1.2-November-15-2017.pdf. You must
agree in order to register with the ACME server at
https://acme-v01.api.letsencrypt.org/directory
-------------------------------------------------------------------------------
(A)gree/(C)ancel:
3.要收到他們的信嗎?
-------------------------------------------------------------------------------
Would you be willing to share your email address with the Electronic Frontier
Foundation, a founding partner of the Let's Encrypt project and the non-profit
organization that develops Certbot? We'd like to send you email about our work
encrypting the web, EFF news, campaigns, and ways to support digital freedom.
-------------------------------------------------------------------------------
(Y)es/(N)o:
3.以下,叫你選你的Domain Name,通常就是第一個,選「1」後,按 Enter
Which names would you like to activate HTTPS for?
-------------------------------------------------------------------------------
1: xxx.xxx.chc.edu.tw
-------------------------------------------------------------------------------
Select the appropriate numbers separated by commas and/or spaces, or leave input
blank to select all options shown (Enter 'c' to cancel):
4.以下,問你要不要把 http 直接導引到 https ,選 1 或 2 後,Enter
Please choose whether or not to redirect HTTP traffic to HTTPS, removing HTTP access.
-------------------------------------------------------------------------------
1: No redirect - Make no further changes to the webserver configuration.
2: Redirect - Make all requests redirect to secure HTTPS access. Choose this for
new sites, or if you're confident your site works on HTTPS. You can undo this
change by editing your web server's configuration.
-------------------------------------------------------------------------------
Select the appropriate number [1-2] then [enter] (press 'c' to cancel):
成功!!
試看看,真的不用五分鐘就好了!!連 apache2 都不用 reload 和 restart
不過只有 90 天的期限,就要 renew
renew 的指令如下:
sudo crontab -e
填上:
二、連線到 cerbot 網站
https://certbot.eff.org/
選擇好你的 web server 及 os,我選的是 apache 、ubuntu 16.04
三、執行以下程式,安裝 cetbot
$ sudo apt-get update
$ sudo apt-get install software-properties-common
$ sudo add-apt-repository ppa:certbot/certbot
$ sudo apt-get update
$ sudo apt-get install python-certbot-apache
四、執行安裝導引程式
$ sudo certbot --apache1.填寫email
Saving debug log to /var/log/letsencrypt/letsencrypt.log
Plugins selected: Authenticator apache, Installer apache
Enter email address (used for urgent renewal and security notices) (Enter 'c' to
cancel):
2.同意
Please read the Terms of Service at
https://letsencrypt.org/documents/LE-SA-v1.2-November-15-2017.pdf. You must
agree in order to register with the ACME server at
https://acme-v01.api.letsencrypt.org/directory
-------------------------------------------------------------------------------
(A)gree/(C)ancel:
3.要收到他們的信嗎?
-------------------------------------------------------------------------------
Would you be willing to share your email address with the Electronic Frontier
Foundation, a founding partner of the Let's Encrypt project and the non-profit
organization that develops Certbot? We'd like to send you email about our work
encrypting the web, EFF news, campaigns, and ways to support digital freedom.
-------------------------------------------------------------------------------
(Y)es/(N)o:
3.以下,叫你選你的Domain Name,通常就是第一個,選「1」後,按 Enter
Which names would you like to activate HTTPS for?
-------------------------------------------------------------------------------
1: xxx.xxx.chc.edu.tw
-------------------------------------------------------------------------------
Select the appropriate numbers separated by commas and/or spaces, or leave input
blank to select all options shown (Enter 'c' to cancel):
4.以下,問你要不要把 http 直接導引到 https ,選 1 或 2 後,Enter
Please choose whether or not to redirect HTTP traffic to HTTPS, removing HTTP access.
-------------------------------------------------------------------------------
1: No redirect - Make no further changes to the webserver configuration.
2: Redirect - Make all requests redirect to secure HTTPS access. Choose this for
new sites, or if you're confident your site works on HTTPS. You can undo this
change by editing your web server's configuration.
-------------------------------------------------------------------------------
Select the appropriate number [1-2] then [enter] (press 'c' to cancel):
成功!!
試看看,真的不用五分鐘就好了!!連 apache2 都不用 reload 和 restart
不過只有 90 天的期限,就要 renew
renew 的指令如下:
sudo certbot renew --dry-run你可以把它寫進 contab ,自動更新
sudo crontab -e
填上:
0 0 1 * * /root/certbot-auto renew --quiet
2018年4月11日 星期三
ACFS-Centos7記要
1.修改預設的 firewall 程式為自訂的
sudo vim /etc/rc.local
#/usr/bin/firewall.sh 改成 /usr/bin/firewall.sh
2.修改 firewall.sh
sudo vim /usr/bin/firewall.sh
3.安裝php-ldap套件
sudo yum -y install php-ldap
4.重啟apache2
sudo /sbin/service httpd restarts
5.修改mysql密碼
mysqladmin -uroot -p password '新密碼'
6.apache設定檔
/etc/httpd/conf.d/acfs..conf
7.安裝ncftp
sudo yum -y install ncftp
8.php.ini
max_input_vars =3000
9.改ip
cd /etc/sysconfig/network-scripts/
底下ifcfg-xxx
sudo vim /etc/rc.local
#/usr/bin/firewall.sh 改成 /usr/bin/firewall.sh
2.修改 firewall.sh
sudo vim /usr/bin/firewall.sh
3.安裝php-ldap套件
sudo yum -y install php-ldap
4.重啟apache2
sudo /sbin/service httpd restarts
5.修改mysql密碼
mysqladmin -uroot -p password '新密碼'
6.apache設定檔
/etc/httpd/conf.d/acfs..conf
7.安裝ncftp
sudo yum -y install ncftp
8.php.ini
max_input_vars =3000
9.改ip
cd /etc/sysconfig/network-scripts/
底下ifcfg-xxx
2018年3月12日 星期一
ubuntu安裝java8
參考:
https://blog.gtwang.org/linux/how-to-install-java-with-apt-get-on-ubuntu-linux/
查java
設定 JAVA_HOME 環境變數
填入
JAVA_HOME="/usr/lib/jvm/java-8-oracle"
載入
試看看
https://blog.gtwang.org/linux/how-to-install-java-with-apt-get-on-ubuntu-linux/
sudo add-apt-repository ppa:webupd8team/java
sudo apt-get update
sudo apt-get install oracle-java8-installer
查java
update-alternatives --query java
設定 JAVA_HOME 環境變數
sudo vim /etc/environment
填入
JAVA_HOME="/usr/lib/jvm/java-8-oracle"
載入
source /etc/environment
試看看
echo $JAVA_HOME
訂閱:
文章 (Atom)