程式CODE

顯示具有 XOOPS2模組學習 標籤的文章。 顯示所有文章

2016年9月9日 星期五

tadnews設定校內文件


先查校內文件的編號是多少


查一下校內ip出去是多少

在tadnews/class/tadnews.php中
約第840行....

再寫入下列程式
在 $prefix_tag=$this->mk_prefix_tag($prefix_tag); 前


//設定校內文件編號7...非校內ip立即跳開
if($prefix_tag==7 and $_SERVER[REMOTE_ADDR]<>"校內IP"){
  $tadnews_files = "";
  $news_title="<-----------校內文件,僅限教職員校內閱讀----------->";
  if(!empty($_REQUEST[nsn])){
    header("Location:http://跳轉網址");
  }
}


搭配在tadnews偏好設定中的「僅秀出標題」


2013年9月30日 星期一

XOOPS2.5可以用tinymce


XOOPS2.5的後台,可以選擇使用tinymce

我怎麼現在才知道啊

1.先選[偏好設定]-[系統管理]


2.最下方就可以改預設的編輯器了啊!


3.以新增區塊來說,就是tinymce所見即所得的編輯器了,還可以直接上傳圖片喔!
選下圖中的[XOOPS進階圖片管理員]


4.出現下面的圖,最右邊的圖,可以開啟上傳介面


5.先新增分類,就可以新增圖片了


6.tinymce還可以設定滑鼠經過圖片時的交替喔!真是太棒了!


再來,

我喜歡用的tinyd模組中,雖然我在上面的步驟改「模組預設編輯器」是tinymce,

但還是沒跑出來,找了一下資料,在/ROOT/xoops_data/configs/xoopsconfig.php

找到,

        //"editor"    => "fckeditor",
        //"editor"    => "dhtmlext",

在下面加一行:
        "editor"    => "tinymce",

就行啦!


XOOPS移機注意事項


一、 mysql 資料庫可在phpMyAdmin裡匯出,然後在新機上匯入

二、整個XOOPS資料夾可移至新機,若路徑不一樣,修改mainfile.php

三、若有更改IP,除了要改mainfile.php外,另外在檔案xoops_data/caches/xoops_cache/xoops_adminmenu_XoopsGuiDefault.php

約第7行處,也有要改的地方,否則後台的快速鏈結仍會是舊ip

四、有些模組會記錄到舊的ip...不妨在phpMyAdmin裡搜索舊ip...再一一更正過來


用phpMyAdmin改Mysql密碼,及xoops的處置

若是灌好xoops了,要更改Mysql的密碼(組長交接了)

可以使用phpMyAdmin更改Mysql的密碼,

不過,這會讓已經灌好的xoops無法讀取Mysql。

做法:

一、若phpMyAdmin沒有更改local密碼的地方,


那是因為預設值是關起來的,到phpMyAdmin資料夾,
去找config.inc.php檔,開啟後,找到 $cfg['ShowChgPassword'] 變數
把FALSE值,改成「TRUE」


這時,登入phpMyAdmin後,就會發現有更改密碼的地方了


二、改完密碼後,又發現一個問題,XOOPS上不去了,
那是因為抓不到資料庫,改一下 xoops資料夾內的 mainfile.php
找到 XOOPS_DB_PASS 變數,改成新的Mysql密碼即可。


更改XOOPS的樣板

一、copy一個default的樣板

二、指定目前的樣板使用新copy的這一個

三、可以修改了!

2013年5月19日 星期日

tad x_user 會員強化管理模組(for XOOPS 2.2.4)的小修正

tad大大的x_user模組可以大量新增新會員

下載:
http://www.tad0616.net/modules/tad_uploader/index.php?op=dlfile&cfsn=78&cat_sn=58&name=78_x_user.rar


這在xoops2 2.5.6在大觛新增一直出錯


經檢查後發現
在該模組底下的「function.php」第6行


將
$where=(ereg("XOOPS 2.0",XOOPS_VERSION))?"where uname='{$id}'":"where loginname='{$id}'";

改為
$where=(ereg("XOOPS 2.0",XOOPS_VERSION))?"where uname='{$id}'":"where uname='{$id}'";

即可

下載修改好的版本:
https://docs.google.com/file/d/0B7DFYUyae7cibDd4SE1Bc2ZDNVE/edit?usp=sharing

2013年4月24日 星期三

語系功能

前台一般頁面
常數放language/main.php
「_AM_模組縮寫_辭意」


後台頁面
常數放language/admin.php
「_MD_模組縮寫_辭意」

區塊
常數放language/blocks.php
「_MB_模組縮寫_辭意」

/admin/menu.php及xoops_version.php
常數放language/modinfo.php


2013年4月9日 星期二

XOOPS2的內建常數、函式、類別與物件

參考自桃園縣自由軟體與資訊教育wiki

一、常數
  (1)XOOPS_ROOT_PATH
      xoops的安裝絕對路徑
  (2)XOOPS_ROOT_URL
      xoops的網路位址

二、核心類別


  (1)XoopsSecurity:安全性檢查,比如HTTP REFERER、security token、
      檢查Global變數、阻擋 badip

  (2)XoopsErrorHandler:錯誤管理,程式中若發生錯誤,
      可交由 ErrorHandler產生相關訊息,避免洩漏系統設定

  (3)XoopsLogger:訊息記錄,可以將 PHP、Smarty、Mysql 執行過程(結果)即時顯示,
      方便偵錯

  (4)Criteria:資料相容基準,為了讓Xoops支援 LDAP、Mysql 的一個虛擬類別

   (5)MyTextSanitizer:文字管理,換助處理變數中字元的轉換(包含SQL Injection),
      預覽畫面,取代"字元過濾選項"設定裡的不當字元,[Code]區塊輸出

  (6)XoopsDatabaseFactory:資料庫基本類別,只負責取得資料庫種類
      (並載入相對的資料庫類別)及連線部份

  (7)XoopsDatabase:資料庫虛擬類別,只負責記錄SQL指令及設定(取得)Xoops Prefix.

  (8)XoopsMySQLDatabaseSafe:繼承自XoopsMySQLDatabase,此類別可以執行
      Select,Insert,Delete,Drop...所有的SQL語法

  (9)XoopsMySQLDatabaseProxy:繼承自XoopsMySQLDatabase,此類別只允許 Select 語法

  (10)XoopsMySQLDatabase:繼承自XoopsDatabase,所有 Mysql 功能都在此類別裡實作

  (11)XoopsTpl:繼承自Smarty,樣版引擎

  (12)XoopsTree:樹狀選單類別,簡單好用的樹狀選單產生,管理類別

  (13)XoopsModule:模組基本類別,透過這個類別對模組安全(更新)、初始化、
      讀取模組資料、權限核對(管理)、載入相對的語系、樣版(區塊)管理

  (14)XoopsMemberHandler、XoopsUser、XoopsGroup:會員管理,群組,使用者,Guest 權限管理

  (15)XoopsSessionHandler:Session 管理

  (16)XoopsTplsetHandler:樣版"組"管理

  (17)XoopsTplfileHandler:樣版"檔案"管理


三、有關使用者


  (1)取得所有會員uid
      例:
  $module_handler = & xoops_gethandler('member');
  $users=$module_handler->getUsers();
  foreach($users as $user){
   if($user->getVar('loginname')) $members[$user->getVar('uid')]=$user->getVar('loginname');
   else $members[$user->getVar('uid')]=$user->getVar('uname');
  }


  (2)新增一個使用者
$member_handler =& xoops_gethandler('member');
$newuser =& $member_handler->createUser();
$newuser->setVar("name", $name);
$newuser->setVar("loginname", $loginname);
$newuser->setVar("uname", $uname);
$newuser->setVar("pass", md5($password));
$newuser->setVar("user_avatar",'blank.gif');
$newuser->setVar("level", 1);
$newuser->setVar("email", $tea_mail);
$newuser->setVar("timezone_offset", '8');
$newuser->setVar("uorder", 0);
$newuser->setVar("umode", 'flat');
$newuser->setVar("user_viewemail",1);
$member_handler->insertUser($newuser);
$uid=$newuser->getVar('uid');
$member_handler->addUserToGroup(XOOPS_GROUP_USERS, $uid);


  (3)$xoopsUser物件下:
$xoopsUser->uid() 取得該使用者的代號
$xoopsUser->uname() 取得該使用者的帳號
$xoopsUser->email() 取得該使用者的電子郵件
$xoopsUser->isAdmin($module_id) 判斷該使用者是否為管理者,若傳回true表示有管理權限,若不給module_id表示目前所在的模組,若指定$module_id為-1且傳回true表示其至少有某一模組的管理權。
$xoopsUser->getGroups() 取得該使用者所屬群組,他是個陣列
以uid取得使用者名稱(傳入的第二個參數1表使用者名稱name,0表暱稱uname)
$uid_name=XoopsUser::getUnameFromId($uid,1);
$uid_name=XoopsUser::getUnameFromId($uid,0);
當然你也可以用$xoopsUser->getVar('uid')的方式取得存在的相關資料,uid可以換成你想要取得的資料,如
取得使用者名稱$uname = $xoopsUser->getVar("uname");
取得使用者$email = $xoopsUser->getVar("email");


四、有關模組
  (1)$xoopsModule物件下
$xoopsModule->mid() 取得模組代號
$xoopsModule->dirname() 取得模組目錄名稱
$xoopsModule->name() 取得模組名稱
$xoopsModule->getInfo($name=null) 取得模組所有訊息,是個陣列
在這裡你一樣可以用$xoopsModule->getVar('mid')的方式取得存在的相關資料,mid可以換成你想要取得的資料,如
$xoopsModule->getVar('isactive') 判斷模組是否啟用

  (2)取得目前的模組
$module_handler = & xoops_gethandler('module');
$modules=$module_handler->getList();

  (3)根據目錄顯示模組資訊
$module_handler = & xoops_gethandler('module');
$module=$module_handler->getByDirName($dirname);
echo $module->name;


五、有關資料庫


  (1)用$xoopsDB->getInsertId() 取得剛新增資料的編號

  (2)用$xoopsDB->errno() 取得錯誤編號

  (3)用$xoopsDB->queryFromFile($file) 執行sql檔案

  (4)用$xoopsDB->getRowsNum($result) 取得$result有幾列資料

  (5)用$xoopsDB->getAffectedRows() 取得Insert, delete, update 等影響幾列資料


六、有關表單
參考這裡,還沒空研究


七、其他

  (1)xoops_error($msg),列印錯誤訊息

  (2)xoops_result($msg),列印結果訊息

  (3)xoops_confirm($hiddens, $action, $msg, $submit=, $addtoken = true),訊息確認盒
      例:
 $op = $_REQUEST['op'];
 if ($op=='restore') {
   die('進行還原');
 }
 //進行還原詢問
 $hiddens=array('backup_table'=>$backup_table,'op'=>'restore');
 $action=$_SERVER['PHP_SELF'];
 $msg='真的要還原'.$backup_table;
 include XOOPS_ROOT_PATH.'/header.php';
 xoops_confirm($hiddens, $action, $msg);
 include XOOPS_ROOT_PATH.'/footer.php';
 exit();


    (4)redirect_header($url, $time = 3, $message = , $addredirect = true) ,網頁導向函式


八、我不懂的
  xoops_gethandler($name, $optional = false ),
  取得系統物件(object) 實例函式

  xoops 內建的核心物件檔案,放在 kernel 下, 物件定義名稱與檔案名稱關係如下

  呼叫 xoops_gethandler('member') 會載入 kernel/member.php ,
  並建立回傳 XoopsMemberHandler 物件

  呼叫 xoops_gethandler('session') 會載入 kernel/session.php ,
  並建立回傳 XoopsSessionHandler 物件


XOOPS2 資料庫的操作xoopsDB物件

要注意的是,
如果要在function裡執行sql操作
記得要把xoopsDB設定為全域,即  global $xoopsDB;


一、列出


  $sql = "select 欄位名 from " .$xoopsDB->prefix("資料表") . " ";
  $result = $xoopsDB->query($sql) ;
  while(list($news_sn) = $xoopsDB->fetchRow($result)){
    程式...
  }


二、修改


  $sql="update ". $xoopsDB->prefix("資料表名稱") ." set 欄位1='值1'  where 欄位2 = '值2'  ";
  $xoopsDB->queryF($sql);  


三、新增


  $sql="insert into ". $xoopsDB->prefix("資料表") ."(欄位1,欄位2) values ( '值1','值2' )";
  $xoopsDB->queryF($sql); 


四、刪除


$sql="delete from ". $xoopsDB->prefix("資料表") ." where 欄位='值' ";
$xoopsDB->queryF($sql);


五、數筆數


$sql = "select count(*) from " .$xoopsDB->prefix("資料表") . " where 欄位='值' ";
$result = $xoopsDB->query($sql) ;
$row=$xoopsDB->fetchRow($result);
echo $row[0];


另外,參考自桃園縣自由軟體與資訊教育wiki

用$xoopsDB->getInsertId() 取得剛新增資料的編號
用$xoopsDB->errno() 取得錯誤編號
用$xoopsDB->queryFromFile($file) 執行sql檔案
用$xoopsDB->getRowsNum($result) 取得$result有幾列資料
用$xoopsDB->getAffectedRows() 取得Insert, delete, update 等影響幾列資料


2013年4月8日 星期一

XOOPS2模組的資料表設計

若新模組需要使用到MySQL資料庫記錄資料
要在模組的「sql」目錄中,建一個附檔名為「.sql」的檔案
內容為新增資料表的sql程式,如:

     CREATE TABLE `et_news_file` ( 

        `file_sn` smallint(5) unsigned NOT NULL auto_increment, 

        `news_sn` smallint(5) unsigned NOT NULL, 

        `file_name` varchar(20) NOT NULL default '', 

        PRIMARY KEY  (`file_sn`)

    ) ENGINE=MyISAM;

記得要有PRIMARY KEY作為索引。

另外,也要在「xoops_version.php」中設定資料表的位置和名稱,如:

//---模組資料表架構---//
$modversion['sqlfile']['mysql'] = 'sql/mysql.sql';
$modversion['tables'][0] = 'et_news_file';

XOOPS模組創作的第一個檔index.php

這是基本的XOOPS2模組程式設計畫面
要先引入XOOPS目錄下的mainfile.php檔
還有前台的「header.php」及「footer.php」檔。
常用$op來決定這個php檔要進什麼操作。


<?php
/*-----------引入檔案區--------------*/
include_once '../../mainfile.php';
include XOOPS_ROOT_PATH."/header.php";
/*-----------function區--------------*/
function show_table(){
  return $table;
}
          /*-----------執行動作判斷區----------*/
$op=empty($_REQUEST['op'])?"":$_REQUEST['op'];
switch($op){
default:
          $main = show_table();
break;
 
        case 狀況一:
          程式
        break;
 
        case 狀況二:
          程式
        break;
}
/*-----------秀出結果區--------------*/
echo $main;

include_once XOOPS_ROOT_PATH.'/footer.php';


?>


XOOPS2模組設計的基本資訊與狀態資訊

在xoops_version.php檔中的第一區
即是設定模組的基本資訊:
不需要的可以「//」把它略過


**************************************************************
//---模組基本資訊---//
$modversion['name'] = '模組中文名稱';
$modversion['version'] = 1.00;
$modversion['description'] = '模組說明';
$modversion['author'] = '作者姓名';
$modversion['credits'] = '相關有功人員';
$modversion['help'] = 'page=help';
$modversion['license'] = 'GNU GPL 2.0';
$modversion['license_url'] = 'www.gnu.org/licenses/gpl-2.0.html/';
$modversion['image'] = 'images/logo.png';
$modversion['dirname'] = basename(dirname(__FILE__));
**************************************************************


若有使用到中文,建議使用定義的常數,
如:
$modversion['name'] = _MI_ET_NEWS_NAME;

然後在「language」目錄的「tchinese_utf8」目錄中「modinfo.php」檔定義:

define("_MI_ET_NEWS_NAME","ET本站公告");

如此一來,即能避免掉語系更換時的困擾。


再來,模組logo的設計為一個92x52的圖檔,
在下列程式中設定位置:

$modversion['image'] = 'images/logo.png';

我們可以使用底下XOOPS風格的底圖來改成自己想要的logo


在xoops_version.php檔中的第二區是狀態資訊...
不是很重要,
不需要的可以「//」把它略過

//---模組狀態資訊---//
$modversion['status_version'] = 'RC';
$modversion['release_date'] = '2013-02-18';
//$modversion['module_website_url'] = '';
//$modversion['module_website_name'] = '';
$modversion['module_status'] = 'RC';
$modversion['author_website_url'] = 'http://etplayinfo.blogspot.tw/';
$modversion['author_website_name'] = 'ET玩資訊';
$modversion['min_php']=5.2;
$modversion['min_xoops']='2.5';


xoops_version.php 檔的內容

xoops_version.php是一個重要的設定檔
許多模組的功能都在這裡

$modversion = array();
//---模組基本資訊---//
$modversion['name'] = '模組中文名稱';
$modversion['version'] = 1.00;
$modversion['description'] = '模組說明';
$modversion['author'] = '作者姓名';
$modversion['credits'] = '相關有功人員';
$modversion['help'] = 'page=help';
$modversion['license'] = 'GNU GPL 2.0';
$modversion['license_url'] = 'www.gnu.org/licenses/gpl-2.0.html/';
$modversion['image'] = 'images/logo.png';
$modversion['dirname'] = basename(dirname(__FILE__));

//---模組狀態資訊---//
$modversion['status_version'] = 'RC';
$modversion['release_date'] = '日期';
$modversion['module_website_url'] = 'http://模組官網/';
$modversion['module_website_name'] = '模組官網名稱';
$modversion['module_status'] = 'RC';
$modversion['author_website_url'] = 'http://開發者網站/';
$modversion['author_website_name'] = '開發者姓名';
$modversion['min_php']=5.2;
$modversion['min_xoops']='2.5';

//---後台使用系統選單---//(此處若沒有設定為1,連偏好設定也無法使用)
$modversion['system_menu'] = 1;

//---模組資料表架構---//
//$modversion['sqlfile']['mysql'] = 'sql/mysql.sql';
//$modversion['tables'][0] = '資料表名稱';

//---後台管理介面設定---//(index.php是後台首頁,menu.php設計選單)
$modversion['hasAdmin'] = 1;
$modversion['adminindex'] = 'admin/index.php';
$modversion['adminmenu'] = 'admin/menu.php';

//---前台主選單設定---//(在主選單中是否出現此模組,以及其子選單路徑)
$modversion['hasMain'] = 1;
//$modversion['sub'][1]['name'] = '';
//$modversion['sub'][1]['url'] = '';

//---模組自動功能---//(在include目錄中,設定安裝、更新、反安裝時,連帶執行的函式)
//$modversion['onInstall'] = "include/install.php";
//$modversion['onUpdate'] = "include/update.php";
//$modversion['onUninstall'] = "include/onUninstall.php";

//---偏好設定---//(設定後台的偏好設定選項)
$modversion['config'] = array();
//$modversion['config'][0]['name'] = '偏好設定名稱(英文)';
//$modversion['config'][0]['title'] = '偏好設定標題(常數)';
//$modversion['config'][0]['description'] = '偏好設定說明(常數)';
//$modversion['config'][0]['formtype'] = '輸入表單類型';
//$modversion['config'][0]['valuetype'] = '輸入值類型';
//$modversion['config'][0]['default'] = 預設值;

//---搜尋---//
//$modversion['hasSearch'] = 1;
//$modversion['search']['file'] = "include/search.php";
//$modversion['search']['func'] = "搜尋函數名稱";
//---區塊設定---//
//$modversion['blocks'] = array();
//$modversion['blocks'][1]['file'] = "區塊檔.php";
//$modversion['blocks'][1]['name'] = 區塊名稱(常數);
//$modversion['blocks'][1]['description'] = 區塊說明(常數);
//$modversion['blocks'][1]['show_func'] = "執行區塊函數名稱";
//$modversion['blocks'][1]['template'] = "區塊樣板.html";
//$modversion['blocks'][1]['edit_func'] = "編輯區塊函數名稱";
//$modversion['blocks'][1]['options'] = "設定值1|設定值2";
//---樣板設定---//
$modversion['templates'] = array();
//$modversion['templates'][1]['file'] = 'xxx.html';
//$modversion['templates'][1]['description'] = '';

//---評論---//
//$modversion['hasComments'] = 1;
//$modversion['comments']['pageName'] = '單一頁面.php';
//$modversion['comments']['itemName'] = '主編號';
//---通知---//
//$modversion['hasNotification'] = 1;

2013年4月7日 星期日

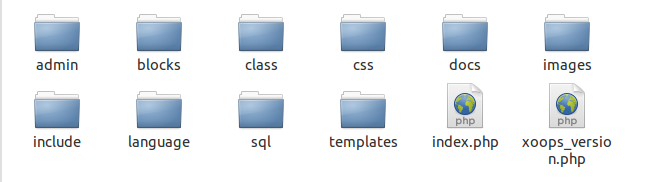
XOOPS2模組的目錄架構

XOOPS2的目錄架構(參考自tad大大的教學)

基本的目錄與檔案說明如下(但也不是全都必須):

admin:放置後台管理程式,主要有index.php及menu.php檔(後台管理時的子選單),在xoops_version.php裡設定。

blocks:放置區塊程式,裡頭有要有區塊主函式和區塊的編輯函式,在xoops_version.php裡設定。

class:額外要引入的物件庫或函式庫(少用)

css:放置模組樣式css檔的目錄

docs:放置說明文件

images:裡頭有「admin」目錄放置後台圖片;「icons」放置前台圖片

include:引入檔目錄,如搜尋(?),及模組自動安裝、更新、反安裝時的函式。

language:語系目錄,定義前台後台的文字常數。正體中文utf8的目錄名稱為「tchinese_utf8」

sql:放置sql檔案的目錄,檔案附檔名為「.sql」,用以建立資料表,在xoops_version.php裡設定。

templates:放置模組樣板檔,檔案附檔名為「.html」,用以使用smarty方式把php程式及html標籤分離。

index.php:進入模組的第一個檔案

xoops_version.php:重要的模組設定檔。